How to Install: Yale Linus® - Scandinavian Lock
The steps below will guide you through installing the Yale Linus® Smart Lock on a Scandinavian style lock.
Within the instructions you will have options depending whether you are carrying out a SSF installation.
Should I carry out a SSF installation?
The Yale Linus® Smart Lock meets SSF 3522 Class 2A certification. As such all of the components you should required to complete a SSF certification are included within the box. If however you want a simpler non SSF installation, we also include those components too. Once you decide the installation instructions will guide you on the relevant steps. There is no change in functionality between a SSF and non-SSF installation.
If you are not sure whether or not you need an SSF installation. We would recommend checking with your insurance company as it may depend on the value of the contents within your property.
Download the Yale Access App
Please continue with setup of the Linus® unit by downloading the Yale Access App.


Installation Preparation
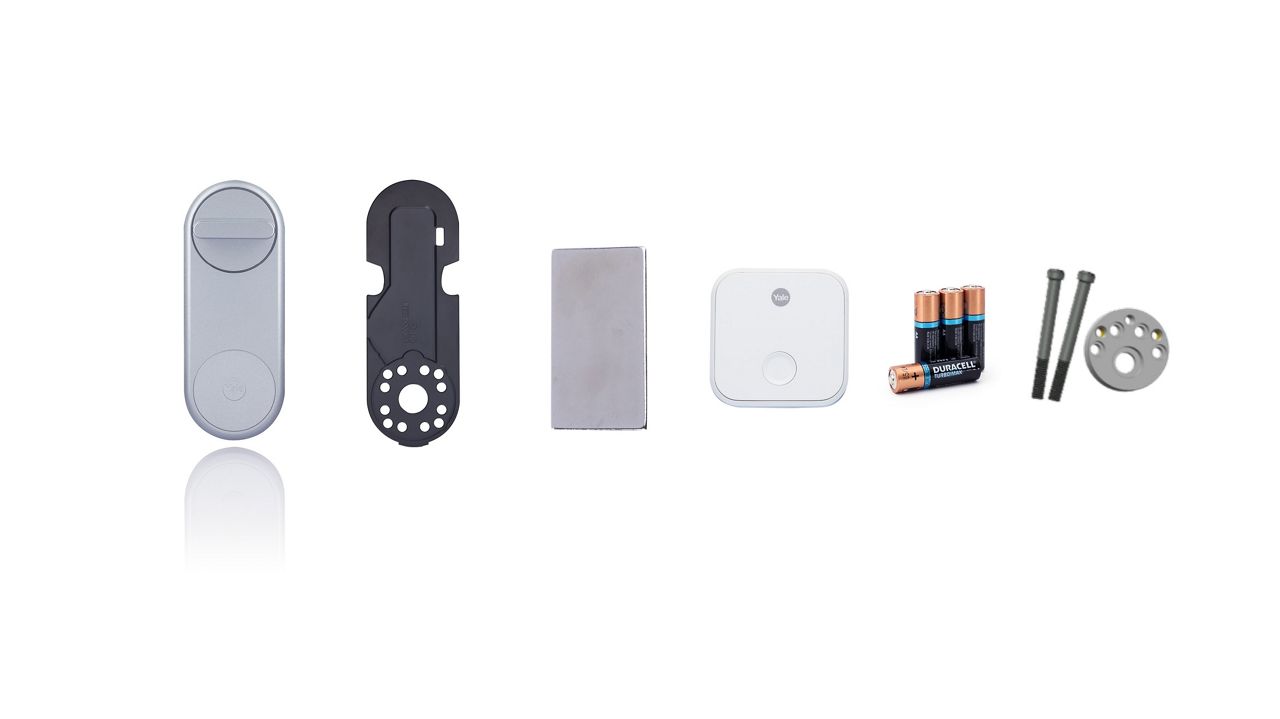
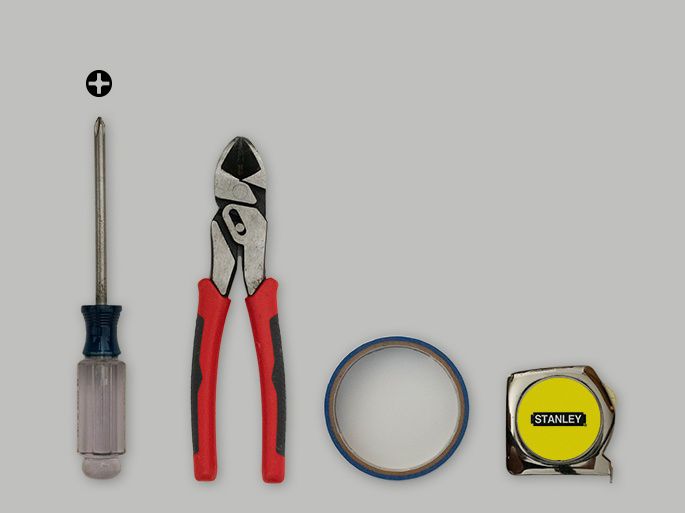
Here you see which components are included in the box and which tools you need to carry out the installation of your new Yale Linus lock.
The box contains the following components:
- Yale Linus
- Backplate
- Thumbturn follower
- Yale Connect Wi-Fi Bridge
- Spindle
- Spindle Adapter
- Cut off mounting screws
- Two sets of cylinder screws (long and short)
- Doorsense Magnet
For a standard installation, the tools required are:
- A pozidrive screwdriver
- masking tape
- Screw Cutting Tool
- Tape measure
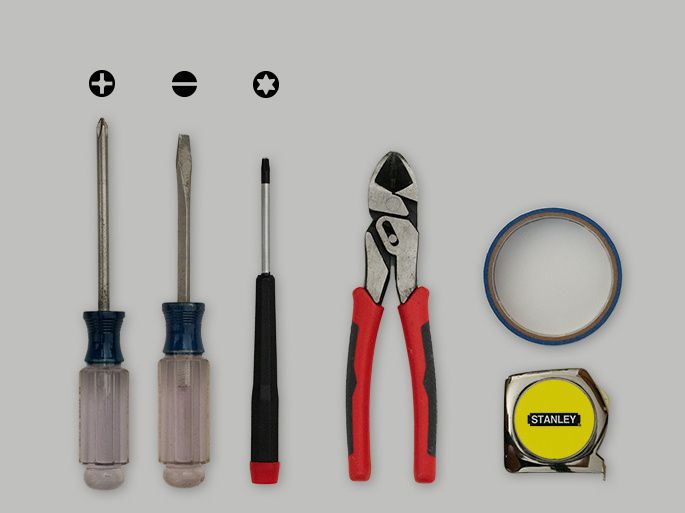
If you would like to make your installation SSF compliant, the following components are also included:
- Cylinder Puck
- Two sets of longer cylinder screws
- A set of one-way mounting screws
For a SSF approved installation you will also need a flat head screwdriver and a Torx screwdriver.
Installation Step-by-step
Installation Step-by-step
Step 1.
Unlock and open the door with a key, then remove the key from the cylinder.

Step 2.
Turn the internal cylinder as far as it will go to the locked direction.

Step 3.
Put tape over the cylinder on the outside of the door to prevent the cylinder falling off when the internal cylinder is removed.

Step 4.
On the internal cylinder (on the inside of the door), remove the screws that are holding it in place.

Step 5.
Unscrew the screws that hold the thumbturn follower in place and remove it along with the spindle.

Step 6.
Check that the arrow in the lock case is facing down. If its not, you can use the spindle to turn it.

Step 7.
Insert the spindle that is provided in the box into the lock. Please measure it and cut it down so that there is 30mm protruding from the surface of the door.
If you would like to use your existing spindle, that's fine providing that it protrudes between 7-40mm from the surface of the door.

Step 8.
Make sure that the spindle remains horizontal during the installation process until you start calibration.

Step 9.
For a SSF compliant installation, please install the black cylinder puck over the spindle using the black screws that are supplied.

Step 10.
If you choose not to use the cylinder puck, please attach the thumbturn follower back onto your lock.
Depending on the thickness of your door you may need to use the longer cylinder screws. If not please use the shorter ones.

Step 11.
Next you will need to cut the mounting screws down to length. Please line the screws up next to the door and cut them 2 notches longer then the external surface of the door to allow them to screw into the external cylinder.
If your existing screws are the correct length you can use those instead.

Step 12.
Next line up the plate. If you have the space on your door, please line up the plate vertically. If however you don't have space, you can also fit it horizontally. After this please screw in the fixing screws to secure it.

Step 13.
Next add the spindle adapter to the spindle.

Step 14.
Open the wings on the Linus unit to allow it to fit over the mounting plate. Please also line up the thumbturn on the unit so that it will fit over the horizontal spindle adapter.

Step 15.
Next hook the Linus unit over the backplate at the bottom and then push the units onto the plate, using the wings to secure it.

Step 16.
Please check that the unit can be locked and unlocked using the thumbturn on the Linus Unit.

Step 17.
Peel the backing film from the Doorsense™ magnet.

Step 18.
Stick the DoorSense™ magnet on the door frame, level with the Yale logo on the Linus® Smart Lock.

Step 19.
You can now remove the tape from the outside of the door.
Step 20.
To power up the unit, please remove the battery cover and pull out the plastic tab. You will see the unit start up.
