Smart Lock Support
Safe Box Support
Yale Home Support
Yale Home Support
Yale Connect Wi-Fi Bridge Support
Yale Smart Keypad Support


How to
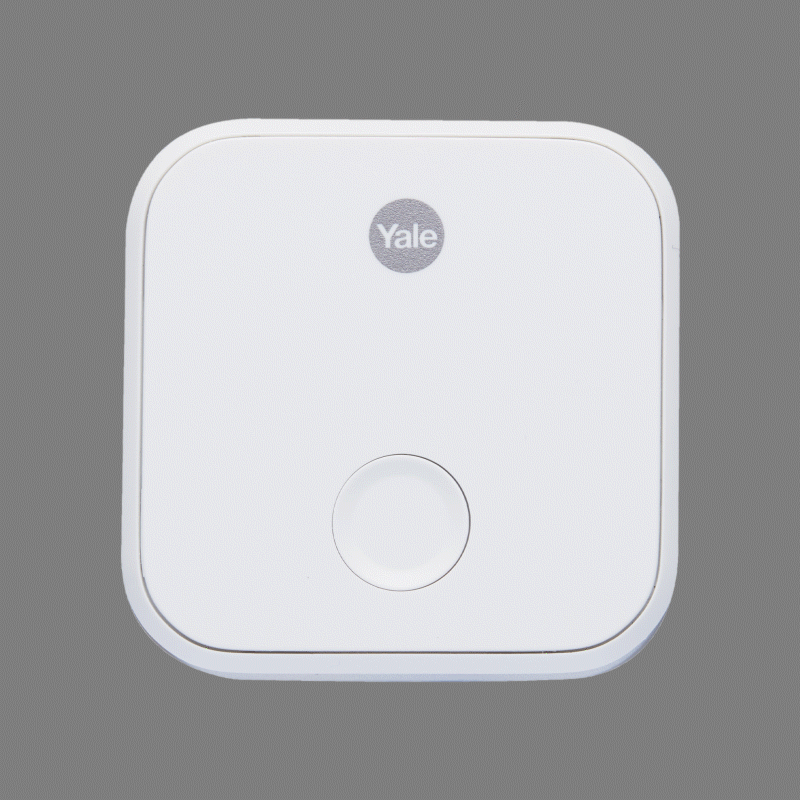
Lock and unlock your Smart Lock remotely, right from your phone. Yale Connect Wi-Fi Bridge serves as a bridge between our Servers and your Smart Lock. With Yale Connect Wi-Fi Bridge, you can instantly let visitors into your home when you're not there.
Requirements
- Make sure your device has Wi-Fi turned on (Settings > Wi-Fi)
- Make sure your phone is connected to your home Wi-Fi network (Connect is compatible with 2.4 gHZ Wi-Fi)
- The Yale Connect Wi-Fi Bridge requires an active Yale Smart Lock and needs to be installed using a compatible phone. Please visit our phone compatibility page to ensure that your phone is compatible.
How to install your Yale Connect Bridge
For optimal performance and reliability, plug Yale Connect Wi-Fi Bridge into a power outlet that is within 15 feet (4.5 meters) on an opposite or adjacent wall from your Yale Smart Lock.
- Wait for the flashing green light on your Yale Connect Wi-Fi Bridge. If you don’t see the flashing green light press and hold the button on your Yale Connect Wi-Fi Bridge for 5 seconds.
- In the Yale Access app, go to the side menu (upper left), tap Set Up New Device.
- Choose Set Up A Connect.
- Choose a lock with which to associate your Yale Connect Wi-Fi Bridge.
- When prompted, plug connect into an outlet near your door and then follow the in-app instructions.
The accessory setup interface will ask you to choose your home Wi-Fi network. Once your Connect has successfully joined your home Wi-Fi network, the Yale Access App will check the signal levels of your Wi-Fi and bluetooth connections. If your signal levels are good, you’re almost finished. If your signal levels are low, you will be guided through adjusting the location of your Yale Connect Wi-Fi Bridge to improve its connection.
If you experience issues joining your Yale Connect Wi-Fi Bridge with your Wi-Fi network, this article provides troubleshooting steps.
Yale Connect Wi-Fi Bridge displays its current status through different LED indicator lights on the front of the device. This article helps you determine what the LED indicators on Yale Connect Wi-Fi Bridge mean as well as any troubleshooting steps you can take to improve functionality.
Errors During Setup
If you experience errors during setup:
- Ensure the device is connected to a 2.4GHz WiFi network
- Verify the Yale Connect Wi-Fi Bridge is within 10-15 ft of the lock
- Ensure the Yale Connect Wi-Fi Bridge is either directly facing the lock or off at a 45° angle (perpendicular) and not located on the same wall as the lock
Steps to install
Step 1. Download the Yale Access App
Download the free Yale Access App on your smartphone and create an account.
Tip: If you already use the August App, use the same login details. You can delete either app after you’ve set up your product and use one app for everyday management.
Step 2. Enable Bluetooth
Enable Bluetooth on your smartphone in the settings.
Step 3. Set up the Device in the Yale Access App
Tap ‘Set up a Device’ from the menu of your Yale Access App.
Step 4. Scan the QR Code
Scan the QR Code located on the Quick Start Guide or on your packaging. If you cannot find your QR code, tap “ Can’t scan QR code” and enter your serial number (begins with M1). The serial number can be found on your white Smart Module.
Tip: If your Serial Number has an O, it is the letter, not the number 0.

Step 5. Install Your Assure Lock
If you haven’t done so already, install the lock on your door. The app will walk you through each step, or you can use the paper install manual included in your packaging for directions.
Step 6. Power Your Assure Lock
Insert the 4 included AA batteries.
Step 7. Create Master Entry Code
Wake the keypad with your palm and press the gear icon. Then enter your desired 4-8 digit master entry code. Press the gear icon to save the code.
Step 8. Remove the Batteries
Step 9. Insert the Smart Module
Insert the smart module into the slot above the battery compartment on your Assure Lock.

Step 10. Install DoorSense
Follow the steps shown in the Yale Access app to install DoorSense.
Step 11. Register Your Smart Module
Enter your master entry code and press the gear. Press ‘7’ and then the gear. Press 1 and then the gear.
Step 12. Calibrate DoorSense
Follow the steps shown in the Yale Access App to calibrate DoorSense.
Step 13. Enable HomeKit
If you are an iOS user, follow steps shown in the Yale Access App to configure your lock with HomeKit. You will need the HomeKit QR code which is on your white smart module.
Tip: The HomeKit QR code has a house icon associated with it.
Step 14. Set up your Connect Wi-Fi Bridge
Scan the QR on the Connect Wi-Fi Bridge. After scanning the QR code, plug in your connect.
Tip: Make sure the connect is plugged into an outlet approximately 10 feet away from your door lock.
Step 15. Create Entry Codes
Select the ‘Guest Link’ icon on the bottom menu of the app. Select the name under “Owner”, and then select entry code.
Tip: Entry codes can be 4 to 8 digits in length.
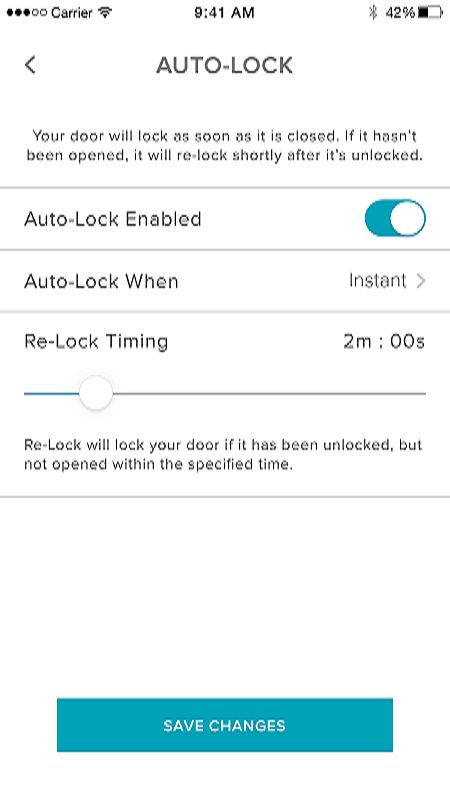
The Auto-Lock feature enables your door to lock automatically after a predetermined amount of time (up to 30 minutes) has passed.
To activate this feature you must be an authorized owner of the associated lock and be located within Bluetooth range of the lock you are enabling this feature on.
PLEASE NOTE: If you want to use the Auto-Lock Timing feature to control when your door locks after it closes, you must have DoorSense™ installed. Without DoorSense™, the door will lock automatically after it closes when Auto-Lock is enabled.
How to Enable Auto-Lock on iOS
The following steps will help you set up the Auto-Lock feature on your iOS device:
- Open the Yale App and select the applicable property from the keychain if there is more than one
- Tap the Settings Gear Icon in the lower right-hand corner on the lock circle screen
- Select the lock from the devices shown
- Select Auto-Lock, which is listed in the automations menu
- Toggle Enable Auto-Lock on and Set the Auto-Lock Timing*
- Select Save Changes at the bottom
This completes the steps to enable the Auto-Lock feature on your Yale Smart Lock. Your lock will automatically lock after the amount of time set in Auto-Lock Timing.
Conversely, if you want to disable the Auto-Lock feature, go through the steps above and Toggle Enable Auto-Lock off. You must be within Bluetooth range of the lock to disable this feature.
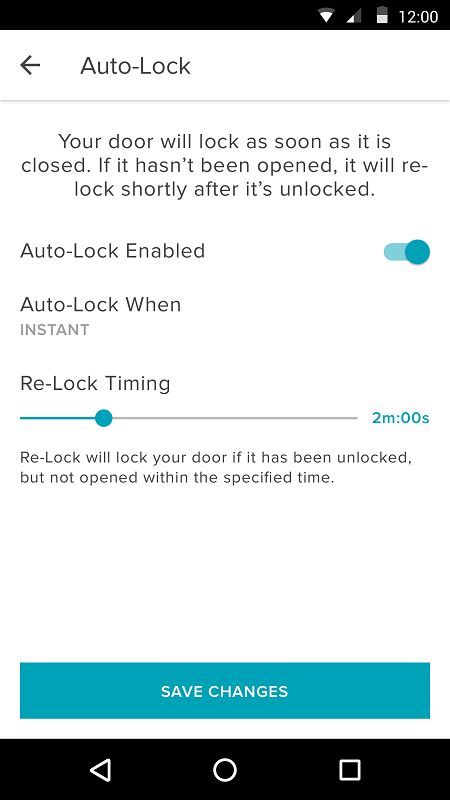
How to Enable Auto-Lock on Android
The following steps will help you set up the Auto-Lock feature on your Android device:
- Open the Yale App and select the applicable property from the keychain if there is more than one
- Tap the Settings Gear Icon in the top right-hand corner on the lock circle screen
- Select the lock from the devices shown
- Select Auto-Lock, which is listed in the automations menu
- Toggle Enable Auto-Lock on and Set the Auto-Lock Timing
- Select Save Changes at the bottom
This completes the steps to enable the Auto-Lock feature on your Yale Smart Lock. Your lock will automatically lock after the amount of time set in Auto-Lock Timing.
Conversely, if you want to disable the Auto-Lock feature, go through the steps above and Toggle Enable Auto-Lock off. You must be within Bluetooth range of the lock to disable this feature.
Watch the tutorial on how to install Yale Linus® here.
Steps to install
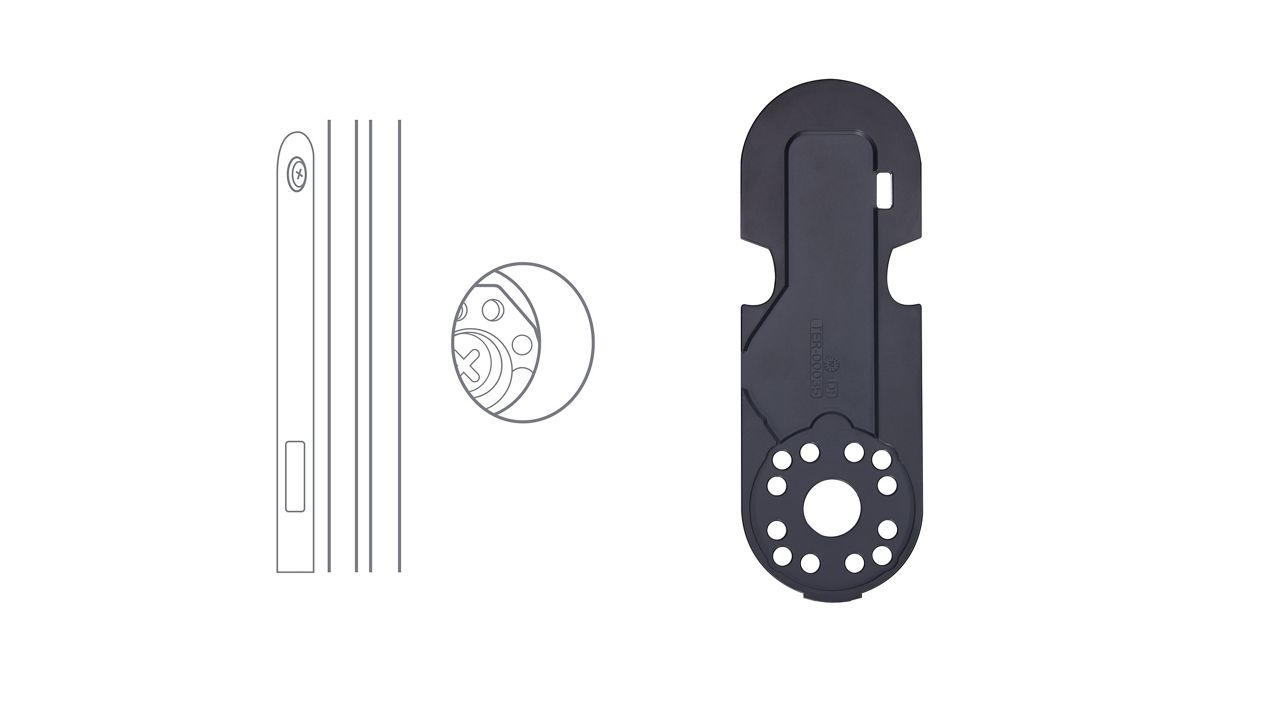
Step 1. Unpack Linus®
Take the Linus® unit out of the box and open the wings to remove the mounting plate.

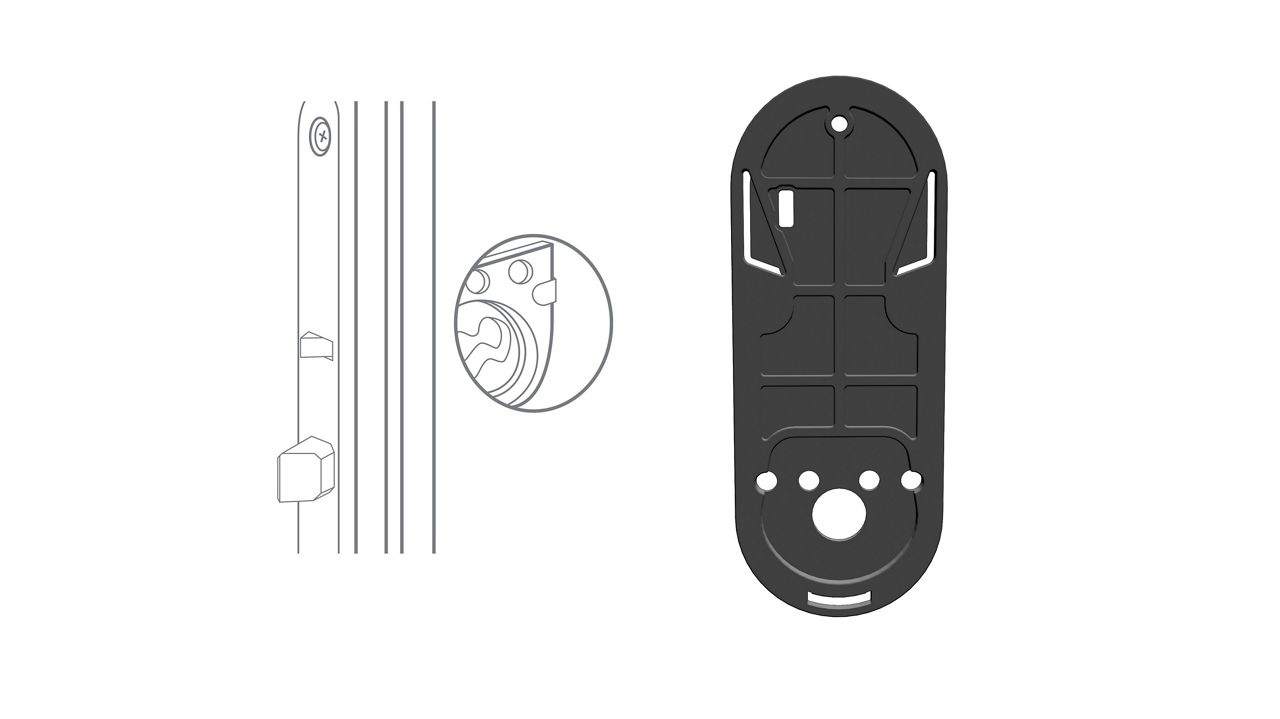
Step 2. Install the Mounting Plate on the Door
Add the mounting plate onto the internal side of your existing cylinder. You may need to loosen the grub screws (the screws on the mounting plate that go around the cylinder) in order to secure the plate properly. This can be done using the Allen key that is provided in the box. Once the plate is on the cylinder, tighten the screws back up holding the short end of the Allen key.

Step 3.
Insert the key into the internal side of your cylinder.

Step 4. Attach Linus® to the Mounting Plate
Mount the Linus® unit onto the mounting plate pushing the top of the unit onto the mounting plate first.

Step 5. Secure Linus® to the Door
Close the ‘wings’ on the Linus® unit to securely fix it in place.

Peel the backing film from the DoorSense™ magnet

Step 6. Place DoorSense™
Stick the DoorSense™ magnet on the door frame, level with the Yale logo on the Linus® Smart Lock.

Please continue with setup of the Linus® unit by downloading the Yale Access app.
Download and Install Yale Access App
Please continue with setup of the Linus® unit by downloading the Yale Access App.
The compatibility checker below will give you information whether the Yale Linus® Smart Lock is compatible with the mechanical lock and cylinder that is on your door.
Compatible Lock Types
Yale Linus® Smart Lock kits differs and is specific for each market regions. Find out the lock type on your door and check the compatibility with below lock types.
Euro Profile/DIN Cylinder Locks Scandinavian Locks
Note: not compatible with a night latch/rim cylinder.Finnish Locks Not Compatible
Below are the lock types that are not compatible to install a Yale Linus. Find out the lock type on your door to check the compatibility.
With existing smart locks
Yale Linus does not require drilling or punching of hole. Therefore, it is not compatible to install on a door with existing smart lock. You may look for a compatible smart lock for your door.Metal Gates
Yale Linus is only suitable to install on a wooden door. You may look for a suitable smart lock for your metal gate.Glass Door
Yale Linus is only suitable to install on a wooden door. You may look for a suitable smart lock for your glass door.Get A Yale Linus® Today
Try out the demo set at our Yale Smart Shop or simply order online straight away.


FAQs
For more FAQs on Yale products

We are here to connect with you.
Talk to our Yale staff at a Yale Smart Shop near you.
For onsite assistance, please call our Yale Support Hotline : +65 6880 0710
